Utangulizi
This manual provides detailed instructions for the installation, operation, and maintenance of your RadioMaster AG02 CNC Hall Gimbal Set. Please read this manual thoroughly before proceeding with installation or use to ensure proper function and longevity of your product. This gimbal set is designed for use with RadioMaster TX16 and TX15 Boxer series transmitters.
Bidhaa Imeishaview
The RadioMaster AG02 CNC Hall Gimbal Set offers enhanced precision and durability for your remote control transmitter. Featuring advanced non-contact Hall effect sensors, these gimbals provide consistent performance without physical wear.
Sifa Muhimu:
- Precision CNC Machined: Constructed with CNC machining for superior durability, smooth operation, and accurate control input.
- Universal Hall Effect Sensors: Equipped with advanced non-contact Hall effect sensors, eliminating physical wear and ensuring consistent performance and extended lifespan.
- Smooth Throttle Function: Includes a dedicated throttle control with smooth sliding action, ideal for managing engine power and other variable functions.
- Reliable Self-Centering: The main control stick features a dependable self-centering mechanism, consistently returning to the neutral position for precise control.
- Enhanced Control Feel: Offers adjustable tension and feel, allowing users to customize gimbal resistance to their personal preference.
Yaliyomo kwenye Kifurushi:
- AG02 CNC Hall Sensor Gimbal (1 set)
- High-tension Springs (2 pieces)
- GH1.25-SH1.25 Adapter Board (for Boxer/TX16sMKII) (1 piece)
- PB2.3 * 10 Mounting Screws (4 pieces)
- Hex Wrench (1 piece)
- Mwongozo wa Mtumiaji (kipande 1)
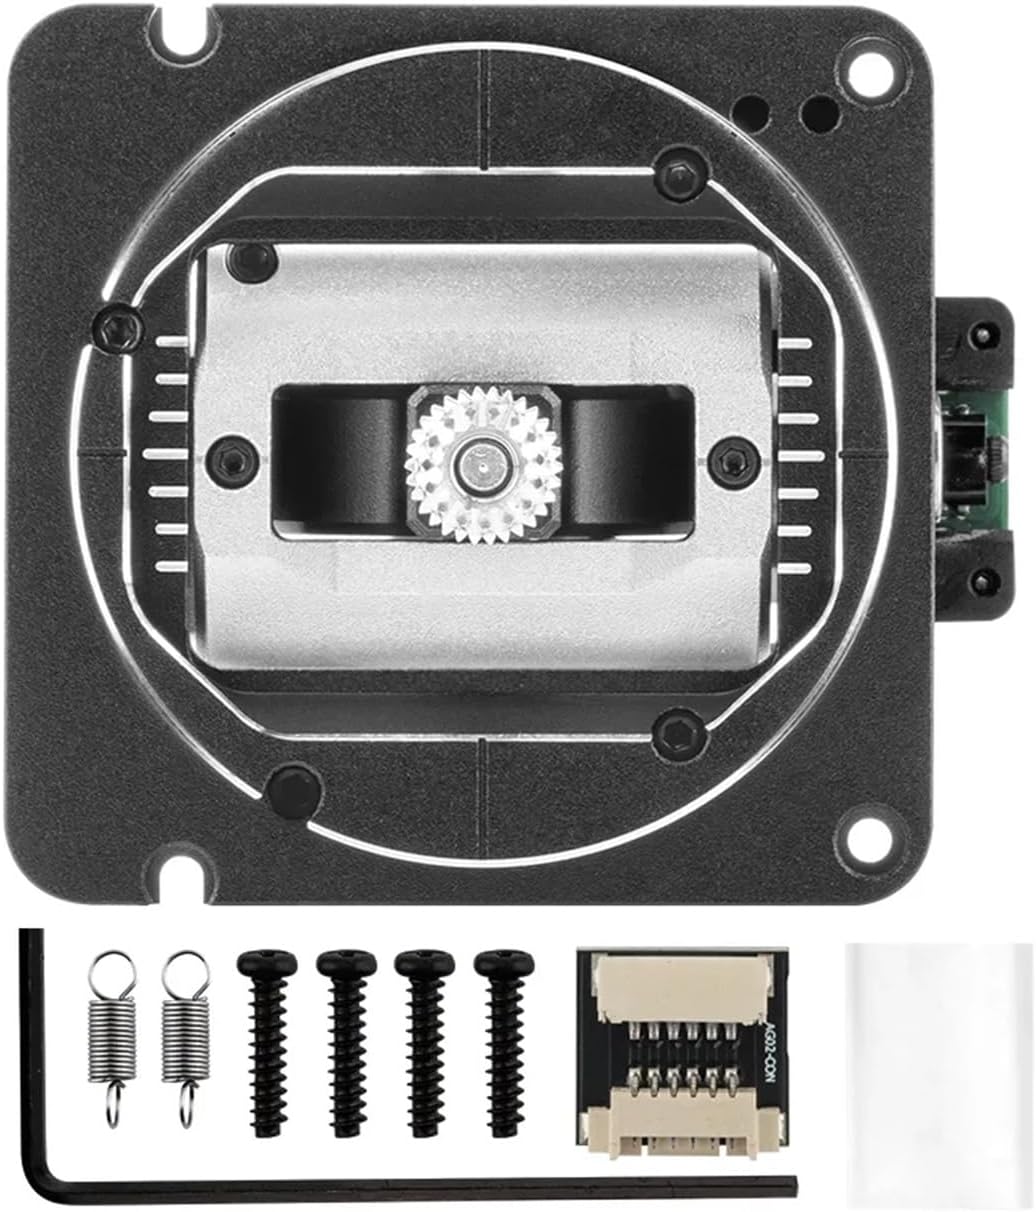
Image: The RadioMaster AG02 CNC Hall Gimbal Set, shown with all included accessories: the gimbal unit, high-tension springs, adapter board, mounting screws, and hex wrench.
Kuweka na Kuweka
This section guides you through the process of installing the AG02 gimbals into your compatible RadioMaster TX16 or TX15 Boxer transmitter. Ensure your transmitter is powered off and disconnected from any power source before beginning.
- Prepare Transmitter: Power off your RadioMaster TX16 or TX15 Boxer transmitter. Carefully open the transmitter casing according to its specific service manual or instructions.
- Remove Existing Gimbals: Disconnect the wiring from the existing gimbals and unscrew them from the transmitter chassis. Retain any screws or small parts that may be needed for reassembly.
- Install AG02 Gimbals: Position the new AG02 CNC Hall Gimbals in the designated slots. Secure them using the provided PB2.3 * 10 mounting screws and the hex wrench.
- Unganisha Wiring: Connect the gimbal wiring to the transmitter's main board. Use the GH1.25-SH1.25 adapter board if required for your specific transmitter model (Boxer/TX16sMKII). Ensure all connections are firm and correctly oriented.

Picha: ya ndani view of the gimbal, highlighting the wiring connections to the circuit board. Ensure proper connection during installation.
- Adjust Spring Tension (Optional): The AG02 gimbals allow for adjustable spring tension. Use the hex wrench to adjust the spring tension to your preferred feel. You may also replace the pre-installed springs with the included high-tension springs if a firmer feel is desired.
- Close Transmitter: Carefully reassemble the transmitter casing, ensuring no wires are pinched and all screws are securely fastened.
- Urekebishaji: After installation, it is crucial to calibrate the new gimbals within your transmitter's firmware settings. Refer to your transmitter's user manual for specific calibration procedures. This ensures accurate recognition of stick movements.

Picha: Juu-chini view illustrating two gimbal units. One shows the self-centering mechanism, while the other displays the smooth throttle slide mechanism, indicating the different functionalities.
Maagizo ya Uendeshaji
Once installed and calibrated, the AG02 gimbals operate similarly to standard gimbals but with enhanced precision and feel due to their Hall effect sensors and CNC construction.
- Stick Movement: The gimbals control the X and Y axes of your aircraft or vehicle. Move the sticks smoothly to achieve desired control inputs.
- Udhibiti wa koo: The throttle stick provides linear control for power. Its smooth action allows for fine adjustments.
- Self-Centering: The self-centering stick will automatically return to its neutral position when released, providing consistent control for pitch and roll.
- Adjustable Feel: If you adjusted the spring tension during installation, you will experience the customized resistance. Further adjustments can be made as described in the Setup section.

Picha: Karibu view of the gimbal stick end, showcasing its knurled texture for improved grip and tactile feedback during operation.
Matengenezo
The AG02 CNC Hall Gimbals are designed for high durability and minimal maintenance due to their non-contact Hall effect sensors. However, regular inspection and basic care will ensure optimal performance.
- Kusafisha: Periodically wipe the gimbal sticks and visible surfaces with a soft, dry cloth to remove dust and debris. Avoid using harsh chemicals or abrasive materials.
- Ukaguzi: Regularly inspect the gimbals for any signs of physical damage, loose screws, or unusual movement. Ensure the wiring connections remain secure.
- Epuka Vichafuzi: Keep the transmitter and gimbals away from excessive moisture, dirt, and extreme temperatures, which can affect electronic components.
- Hakuna Lubrication Inahitajika: Due to the non-contact Hall effect sensors, these gimbals do not require lubrication. Applying lubricants may attract dust and potentially interfere with sensor operation.
Kutatua matatizo
If you encounter issues with your AG02 CNC Hall Gimbal Set, refer to the following common problems and solutions:
| Tatizo | Sababu inayowezekana | Suluhisho |
|---|---|---|
| Gimbal not responding or erratic movement. | Incorrect or loose wiring connection. Improper calibration. | Check all wiring connections to ensure they are secure. Perform a full gimbal calibration through your transmitter's firmware settings. |
| Stick does not return to center. | Spring tension too low. Mechanical obstruction. | Increase spring tension using the hex wrench. Inspect for any physical obstructions preventing the stick from centering. |
| Rough or sticky stick movement. | Debris or foreign objects in the gimbal mechanism. | Carefully inspect the gimbal mechanism for any visible debris. Clean with a soft, dry brush or compressed air. Do not lubricate. |
If the problem persists after attempting these solutions, please contact RadioMaster customer support or your retailer for further assistance.
Vipimo
| Kipengele | Maelezo |
|---|---|
| Aina ya Sensor | Hall Analog |
| Uendeshaji Voltage | DC 3.3V |
| X-axis Travel Range | 30° ~ 56° |
| Y-axis Travel Range | 38° ~ 54° |
| Throttle Mode Switch (Mode 1/2) | Supported (no disassembly required) |
| Adjustable Spring Tension | Supported (without disassembly) |
| Quad Ball Bearings | Ndiyo |
| Kiwango cha Joto la Uendeshaji | -20°C ~ +85°C |
| Dimensions (excluding stick end) | 53 × 53 × 33.3 mm |
| Uzito (kwa kila kitengo) | 73 g ± 1 g |
| Gimbal Stick Thread | M4 |

Picha: upande view of the RadioMaster AG02 gimbal, illustrating its compact dimensions and robust construction.
Udhamini na Msaada
For warranty information, technical support, or service inquiries, please contact your original point of purchase or visit the official RadioMaster webtovuti. Weka uthibitisho wako wa ununuzi kwa madai ya udhamini.


