1. Utangulizi
This manual provides essential instructions for the installation, operation, and maintenance of your GLEDOPTO ESP32 WLED Digital LED Controller (Model GL-C-015WL-D). Please read this manual thoroughly before using the product to ensure proper function and safety.
2. Taarifa Muhimu za Usalama
- The controller chip is ESP32. Verify firmware version information carefully before upgrading. Incorrect firmware upgrades can damage the product.
- Hakikisha ujazo wa uingizajitage (5-24V DC) matches your power supply and LED strip requirements.
- Do not exceed the maximum output current of 10A per channel or 15A total.
- Operate the device within the specified temperature range of -20 to 45 °C.
- Bidhaa hii imeundwa kwa matumizi ya ndani tu.
- Disconnect power before performing any wiring or maintenance.
3. Bidhaa Imeishaview
3.1 Yaliyomo kwenye Kifurushi
- 1 x GLEDOPTO ESP32 WLED Digital LED Controller with Mic / UART (Model: GL-C-015WL-D)
- 1 x Mwongozo wa Mtumiaji
- 1 x 3cm Damper
3.2 Sifa Muhimu
- ESP32 Chip: High-performance processing and stable network connectivity.
- Maikrofoni Iliyojumuishwa: Captures ambient sounds for music synchronization and dynamic lighting effects.
- UART Download Port: Facilitates firmware upgrades and debugging without complex hardware operations.
- Simple Wiring & Expandability: Easy connection ports and an added IO33 port for customization.
- Hali Tajiri Zinazobadilika: Over 100 dynamic lighting effects available.
- Utangamano mpana: Supports various addressable LED strips including WS2811, WS2812, WS2812B, FL19038, SK6812, SM16703P, SM16703SP3, TM1814, WS2813, WS2815, and FCOB.
- Matumizi ya Nguvu ya Chini: Integrated switching regulator for ESP32 power and a MOSFET relay to disable output power when WLED is off.
4. Vipimo
| Nambari ya Mfano | GL-C-015WL-D |
| Uingizaji Voltage | DC 5-24V |
| Max Addressable ICs | 800 |
| Pato la Sasa kwa Idhaa | 10A Max |
| Jumla ya Pato la Sasa | 15A Max |
| Vipimo | 108 x 45 x 18 mm |
| Joto la Uendeshaji | -20 hadi 45 °C |
| Supported LED Strip ICs | WS2811, WS2812, WS2812B, FL19038, SK6812, SM16703P, SM16703SP3, TM1814, WS2813, WS2815, FCOB, etc. |
| Muunganisho | WiFi (ESP32) |
| Vipengele Maalum | Dimmable, Microphone Function, UART Port |
5. Kuweka na Kuweka
5.1 Mpangilio wa Kidhibiti

Maagizo 5.2 ya Wiring
Follow these steps for proper wiring of your LED strip to the controller:

- Connect the positive (+) terminal of your power supply to the V+ input on the controller.
- Connect the negative (-) terminal of your power supply to the V- input on the controller.
- Connect the VCC wire from your LED strip to the V output terminal on the controller.
- Connect the DATA wire from your LED strip to the D (GPIO16) output terminal on the controller. This is the default output. The other D (GPIO2) can be used after configuration in the app.
- Connect the GND wire from your LED strip to the G output terminal on the controller.
5.3 Quick Connect Port Design
The controller features a quick connect port design for convenient wiring:

- Fungua kiunganishi juu.
- Insert the stripped wire into the port.
- Press down on the connector to secure the wire.
6. Uendeshaji
6.1 Kazi za Kitufe
The controller has two physical buttons for basic control:

- Kitufe cha Anzisha Upya: Pressing this button will temporarily power off the controller module. Releasing it will power it back on. This is useful for restarting the controller after configuring the microphone or other settings.
- Opt Button:
- Bonyeza kwa kifupi: Huwasha au kuzima kifaa.
- Bonyeza kwa muda mrefu (sekunde 1): Switches between available colors or effects.
- Bonyeza kwa muda mrefu (sekunde 10): Resets the WLED controller and activates the WLED-AP hotspot for initial setup or re-configuration.
6.2 Udhibiti wa Programu
The GLEDOPTO controller is primarily managed through the WLED application, offering extensive control over your LED strips.
6.2.1 Athari za Nguvu
The WLED app provides access to over 100 dynamic lighting effects, allowing for personalized ambiance.

6.2.2 Segmented Color Control
Customize individual segments of your LED strip to display different colors simultaneously.

6.2.3 Microphone Function
The built-in microphone allows the LED lights to synchronize with music or ambient sounds, creating immersive audio-reactive lighting experiences.


6.3 Ujumuishaji wa Alexa
The controller supports integration with Amazon Alexa for voice control. Follow these steps to connect:
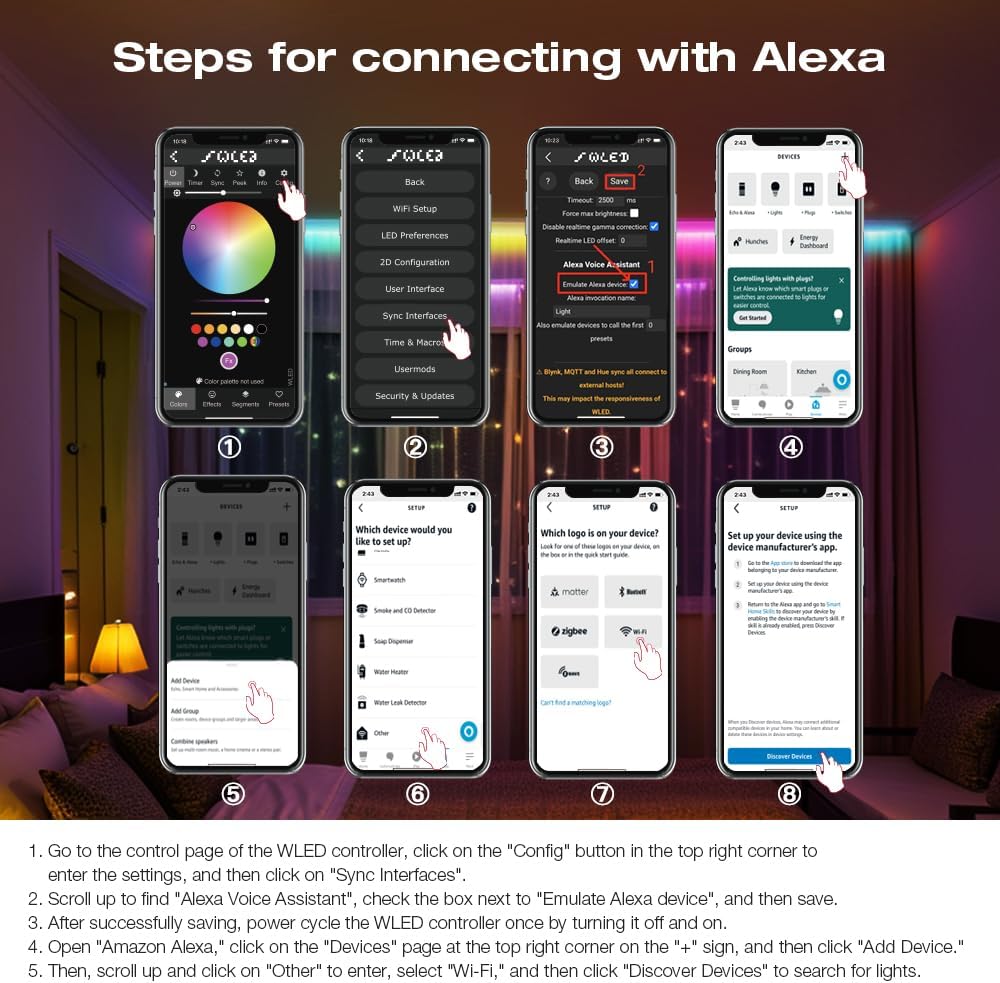
- Go to the control page of the WLED controller in the app, click on the "Config" button in the top right corner to enter the settings, and then click on "Sync Interfaces".
- Scroll up to find "Alexa Voice Assistant", check the box next to "Emulate Alexa device", and then save.
- After successfully saving, power cycle the WLED controller once by turning it off and on.
- Open the Amazon Alexa app, click on the "Devices" page at the top right corner on the "+" sign, and then click "Add Device".
- Then, scroll up and click on "Other" to enter, select "Wi-Fi", and then click "Discover Devices" to search for lights.
7. Sasisho za Firmware
The integrated UART port allows for convenient firmware updates. Refer to the official WLED documentation or GLEDOPTO support resources for detailed instructions on how to perform firmware updates. Always ensure you are using the correct firmware version for your ESP32 chip to prevent damage.
8. Matengenezo
- Keep the controller clean and free from dust. Use a dry, soft cloth for cleaning.
- Epuka kuweka kidhibiti kwenye unyevu au joto kali.
- Hakikisha uingizaji hewa sahihi karibu na kifaa ili kuzuia overheating.
9. Utatuzi wa shida
- Kidhibiti hakiwashi: Check power supply connections and ensure the input voltage is within the 5-24V DC range.
- Kipande cha LED hakiwaki: Verify all wiring connections (VCC, DATA, GND) are secure and correct. Ensure the LED strip type is supported by the controller.
- Hakuna muunganisho wa Wi-Fi: Perform a long press (10 seconds) on the Opt button to reset the controller and activate the WLED-AP hotspot for re-configuration. Ensure your router is operating on a 2.4GHz band.
- Masuala ya ujumuishaji wa Alexa: Double-check that "Emulate Alexa device" is enabled in the WLED app settings and that you have power cycled the controller after saving. Ensure the Alexa app is discovering devices on the correct network.
- Incorrect colors or effects: Verify the LED strip type and IC settings in the WLED app.
10. Udhamini na Msaada
For warranty information and technical support, please refer to the GLEDOPTO official webtovuti au wasiliana na muuzaji wako. Weka risiti yako ya ununuzi kwa madai ya udhamini.


