Utangulizi
This manual provides essential information for the proper use and understanding of the DIYmall 8 RGB LED Stick (WS2812B 5050). These modules feature individually addressable RGB LEDs, suitable for various lighting and display projects. Please read this manual thoroughly before installation and operation.
Vipengele vya Bidhaa
- Integrated Drivers: Each 5050 RGB LED includes an integrated WS2812B driver.
- Individual Addressability: Each LED can be controlled independently to display 16,777,216 colors (24-bit color depth).
- Kiwango cha Juu cha Kuonyesha upya: Scan frequency not less than 400Hz/s.
- Upana VoltagAina: Operates on DC 4-7V.
- Single-Wire Communication: Simplified control interface.
- Maombi Mengi: Suitable for full-color modules, soft light strips, decorative lighting, and irregular LED video screens.
Vipimo
| Chapa | Duka la DIY |
| Mfano | WS2812B 5050 RGB LED Stick |
| Voltage | DC 4-7V |
| Aina ya Chanzo cha Mwanga | LED (WS2812B 5050 RGB) |
| Number of LEDs per Stick | 8 |
| Kiolesura cha Mawasiliano | Waya moja |
| Vipimo (takriban.) | mm 54 x 10 mm |
| Nyenzo | Metal (PCB) |
| Matumizi ya Ndani/Nje | Indoor, Outdoor (Note: Not Water Resistant) |
| Njia ya Kudhibiti | External Microcontroller (e.g., Arduino, Raspberry Pi) |
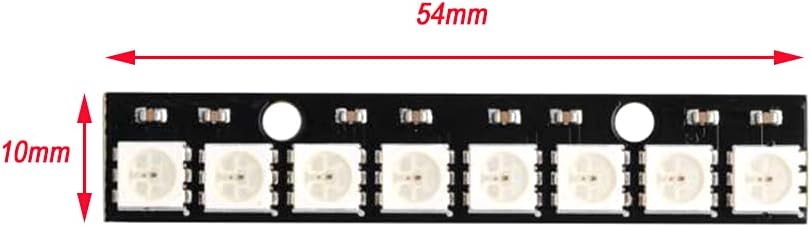
Image: Dimensions of the DIYmall 8 RGB LED Stick, showing a length of 54mm and a width of 10mm.
Yaliyomo kwenye Kifurushi
Kila kifurushi kina:
- 10 x WS2812B 5050 RGB LED Modules (8 LEDs per module)
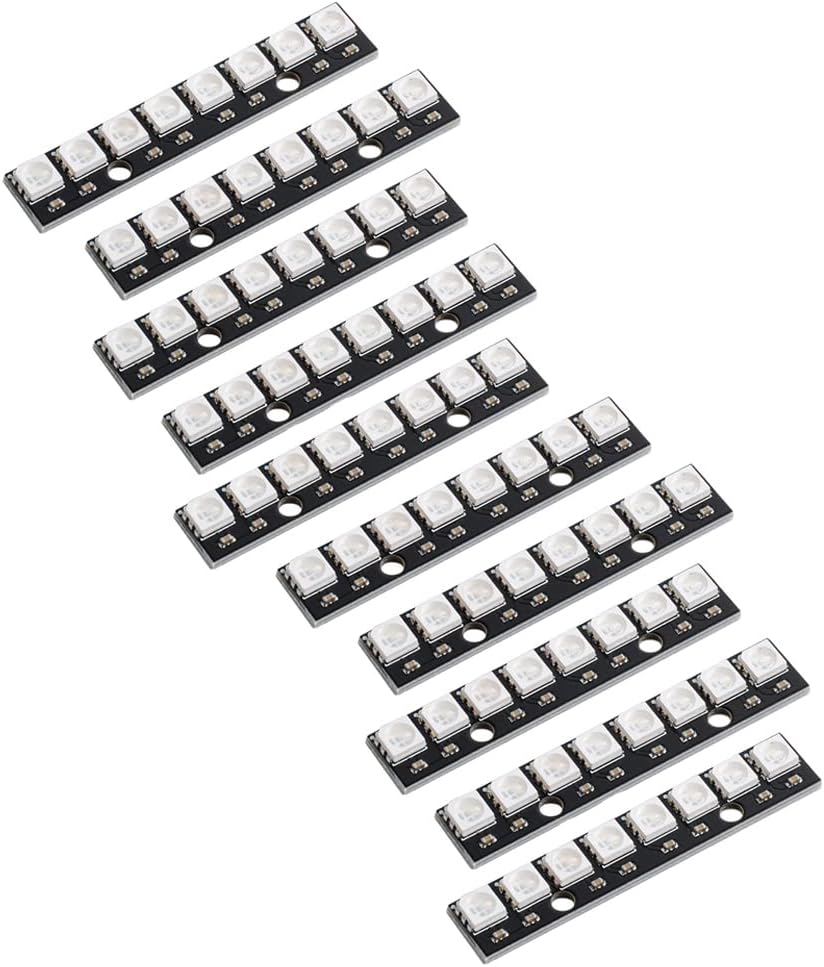
Image: A pack of ten DIYmall 8 RGB LED Sticks, each featuring eight individually addressable LEDs.
Sanidi
To set up the DIYmall 8 RGB LED Stick, follow these steps:
- Ugavi wa Nguvu: Connect a DC 4-7V power supply to the VCC and GND pins of the LED stick. Ensure the power supply can provide sufficient current for all LEDs at full brightness (approximately 60mA per LED at 5V, so 8 LEDs * 60mA = 480mA per stick).
- Muunganisho wa Data: Connect the DIN (Data In) pin of the LED stick to a digital output pin on your microcontroller (e.g., Arduino, Raspberry Pi).
- Muunganisho wa Ardhi: Ensure the GND pin of the LED stick is connected to the ground of your microcontroller and power supply.
- Multiple Sticks (Daisy Chaining): For connecting multiple sticks, connect the DOUT (Data Out) pin of the first stick to the DIN pin of the next stick. Ensure all sticks share a common ground and receive adequate power.

Image: The reverse side of the LED stick, displaying the VCC, DIN, DOUT, and GND connection points.
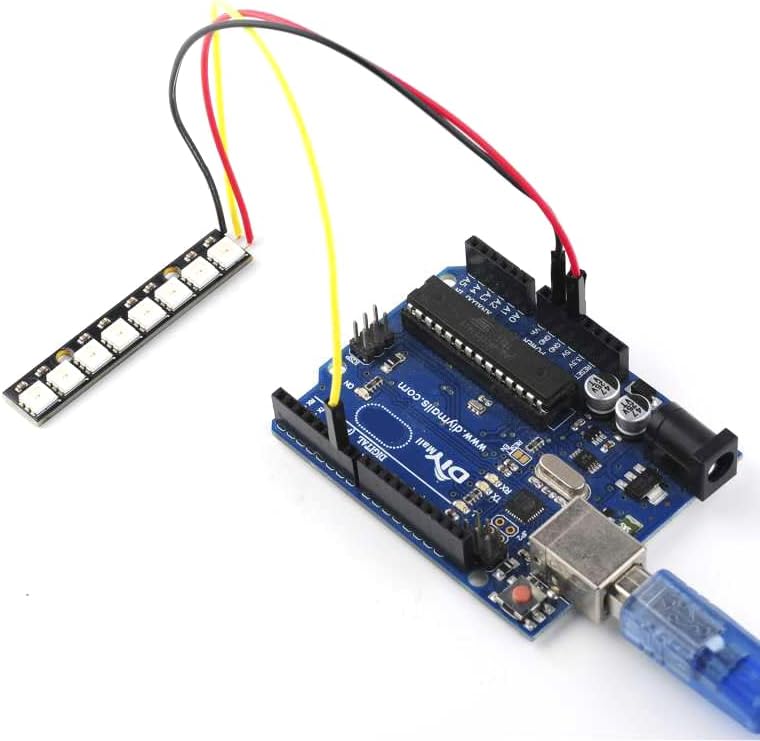
Image: An 8 RGB LED Stick wired to an Arduino board, demonstrating a typical setup for control.
Maagizo ya Uendeshaji
The DIYmall 8 RGB LED Sticks are controlled via a single-wire protocol, typically using a microcontroller. Popular libraries like Adafruit NeoPixel or FastLED are recommended for ease of programming.
- Install Library: For Arduino, install the "Adafruit NeoPixel" library from the Library Manager. For Raspberry Pi, use a suitable Python library (e.g.,
rpi_ws281x). - Basic Code Structure (Arduino Example):
#include <Adafruit_NeoPixel.h> #define PIN 6 // Digital pin connected to the LED stick's DIN pin #define NUMPIXELS 8 // Number of LEDs on the stick Adafruit_NeoPixel pixels(NUMPIXELS, PIN, NEO_GRB + NEO_KHZ800); void setup() { pixels.begin(); // Initialize NeoPixel library } void loop() { // Example: Set all pixels to red for(int i=0; i<NUMPIXELS; i++) { pixels.setPixelColor(i, pixels.Color(255, 0, 0)); // Red color } pixels.show(); // Update the LED stick delay(1000); // Wait for 1 second // Example: Set all pixels to blue for(int i=0; i<NUMPIXELS; i++) { pixels.setPixelColor(i, pixels.Color(0, 0, 255)); // Blue color } pixels.show(); // Update the LED stick delay(1000); // Wait for 1 second } - Upload Code: Upload your program to the microcontroller.
- Zingatia: The LEDs should illuminate and change color according to your code.

Image: The 8 RGB LED Stick illuminated with a vibrant blue color.

Image: The 8 RGB LED Stick displaying a gradient of red and green colors.

Picha: Example of multiple WS2812B LED rings and sticks connected and displaying a range of colors, demonstrating their versatility.

Image: A diagram illustrating how to daisy-chain multiple WS2812B LED rings of different sizes (8, 16, 24, 35, 45 LEDs) for sequential control, connected to a USB remote controller.
Matengenezo
The DIYmall 8 RGB LED Sticks are low-maintenance devices. Follow these guidelines to ensure longevity:
- Kusafisha: If necessary, gently wipe the surface with a dry, soft cloth. Avoid using liquids or abrasive cleaners.
- Hifadhi: Hifadhi katika mazingira kavu, yasiyo na vumbi wakati haitumiki.
- Masharti ya Mazingira: While rated for indoor/outdoor use, these modules are isiyostahimili maji. Protect them from direct moisture and extreme temperatures.
- Ugavi wa Nguvu: Always use a stable power supply within the specified voltage range (DC 4-7V) to prevent damage.
Kutatua matatizo
| Tatizo | Sababu inayowezekana | Suluhisho |
|---|---|---|
| LED haziwaka. |
|
|
| Incorrect colors or flickering. |
|
|
| Only some LEDs light up. |
|
|
Udhamini na Msaada
Specific warranty information for this product is not provided in the available documentation. For technical support or inquiries, please refer to the DIYmall official website or contact their customer service through your purchase platform.
You can visit the DIYmall store on Amazon for more products and information: DIYmall Amazon Store.


