Bidhaa Imeishaview
The CURT 13086 Class 3 Trailer Hitch is engineered to provide dependable strength for various towing needs. This custom-fit receiver hitch is designed for specific model years of the Toyota Pickup, ensuring a precise fit and optimal performance. It features a standard 2-inch x 2-inch receiver tube, making it compatible with a wide range of towing accessories.

Image: The CURT 13086 Class 3 Trailer Hitch, a black, robust steel component designed for vehicle-specific mounting.
Taarifa za Usalama
Hoja 65 Onyo: Bidhaa hii inaweza kuwa na kemikali zinazojulikana na Jimbo la California kusababisha saratani na kasoro za kuzaliwa au madhara mengine ya uzazi. Kwa maelezo zaidi, tembelea Maonyo www.P65.ca.gov.
Always ensure that the gross trailer weight (GTW) and tongue weight (TW) of your trailer do not exceed the lowest-rated towing component, which includes the hitch, tow vehicle, and any other towing accessories. Refer to your vehicle's owner's manual for specific towing capacities.
Ni nini kwenye Sanduku
- Hitch ya Trela ya CURT 13086 ya Darasa la 3
- Mounting Hardware (bolts, nuts, washers, spacers as required for installation)
- Maagizo ya Ufungaji
Mwongozo wa Ufungaji
This section provides general steps for installing a basic receiver hitch. Always refer to the specific installation instructions included with your product for detailed, vehicle-specific guidance.
Hatua ya 1: Andaa Gari
Before beginning installation, ensure the vehicle is on a level surface and properly supported. It may be necessary to raise the vehicle using a lift or jack stands for easier access to the underside.

Image: An icon indicating that no drilling is required for this hitch installation, simplifying the process.
Step 2: Inspect Attachment Points
Inspect the vehicle's frame and existing attachment points for any damage, corrosion, or obstructions. Clean any threaded holes with a wire brush if necessary to ensure proper bolt seating.
Video: A demonstration of inspecting vehicle frame and attachment points for a basic receiver hitch installation.
Step 3: Lower Exhaust (If Necessary)
Some installations may require temporarily lowering the vehicle's exhaust system to provide adequate clearance for hitch installation. Use a spray lubricant or soapy water mixture on exhaust hangers to ease removal.
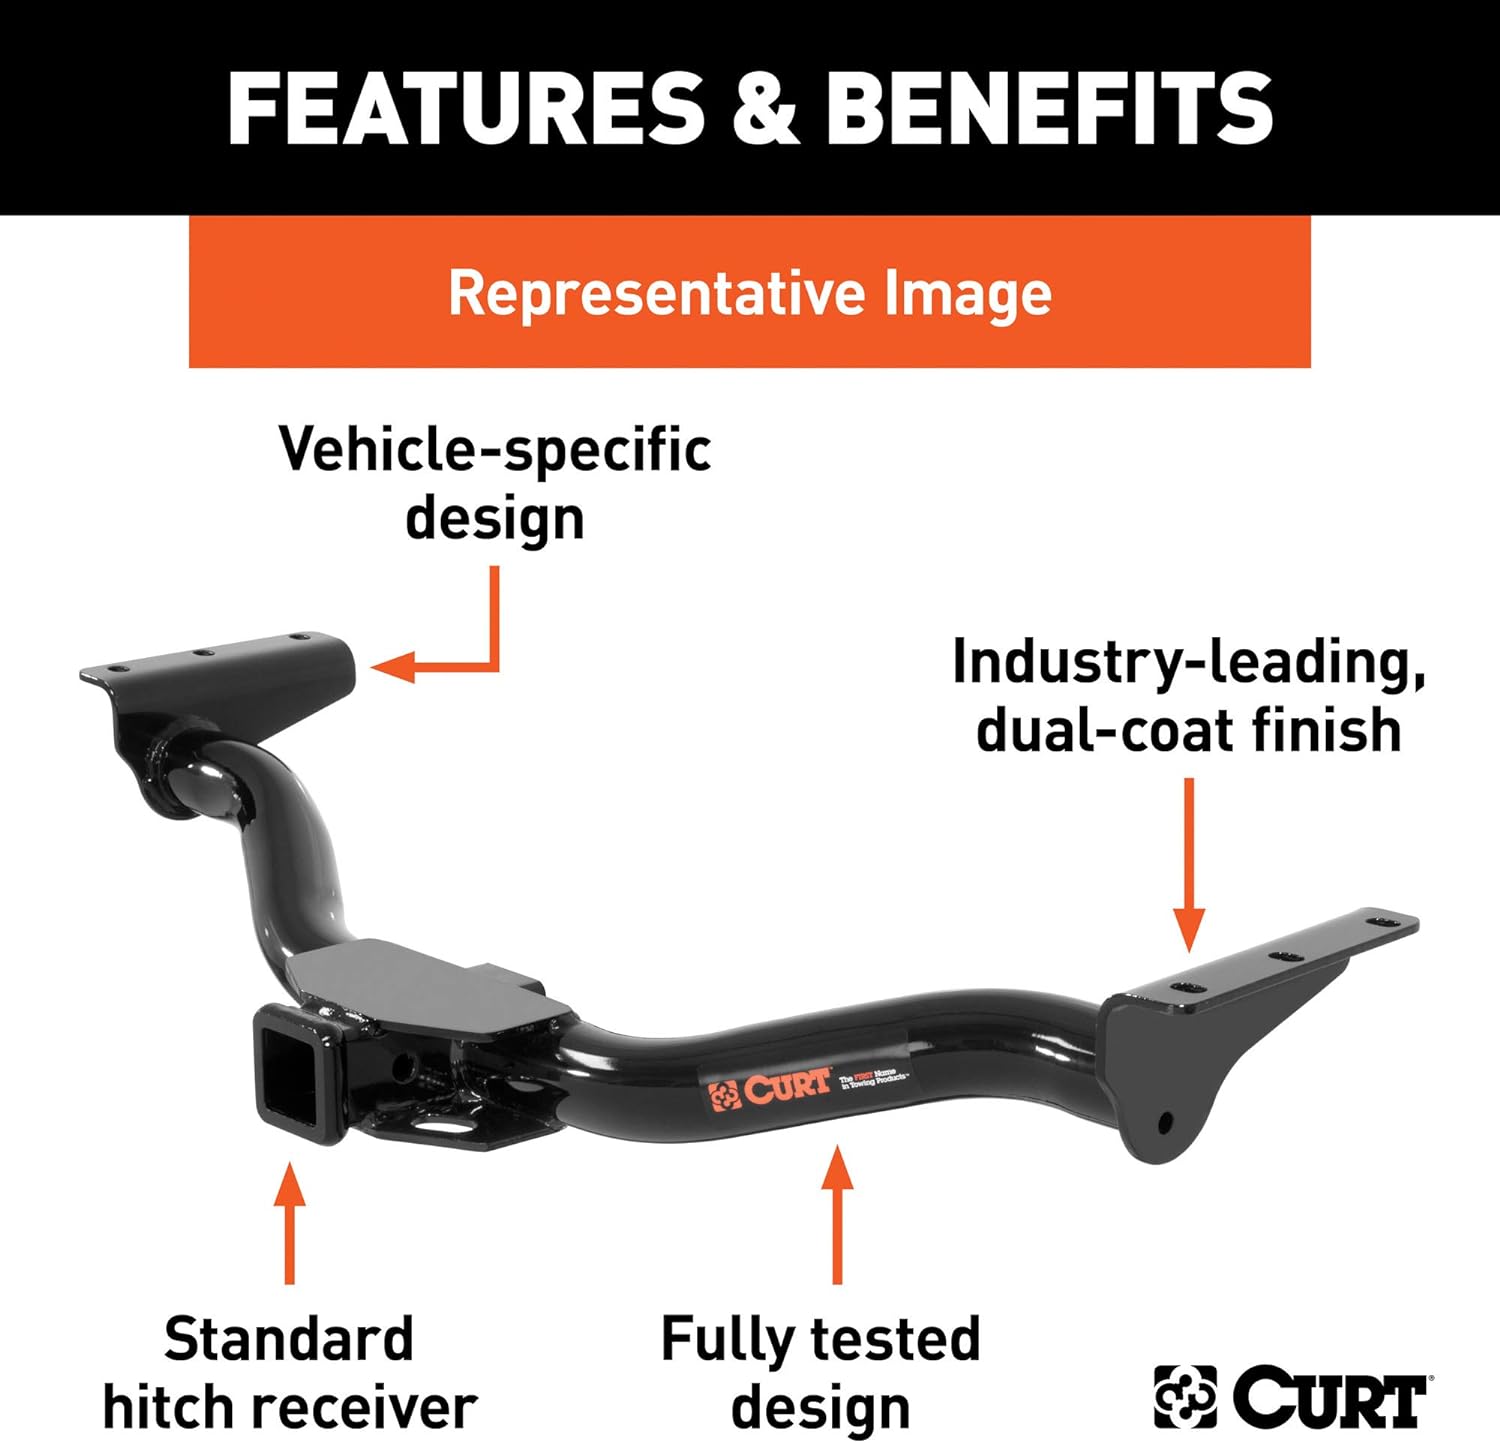
Image: Illustrates the vehicle-specific design and fully tested nature of the hitch, ensuring proper fitment.
Step 4: Position the Hitch
Carefully lift the hitch into position, aligning the mounting holes on the hitch with the vehicle's frame attachment points. It may be helpful to have a second person assist or use jack stands to support the hitch during this step.
Hatua ya 5: Salama Hitch
Install all provided hardware (bolts, nuts, and washers) as per the included instructions. Hand-tighten all fasteners initially to ensure proper alignment and prevent cross-threading. For hard-to-reach areas, specialized fish wire tools may be provided to guide bolts through the frame.
Step 6: Torque All Fasteners
Once all fasteners are hand-tightened, use a torque wrench to tighten them to the specific torque values listed in your instruction manual. It is crucial to follow these specifications to ensure a secure and safe installation. Never use an impact wrench for final tightening.
Maagizo ya Uendeshaji
This Class 3 hitch is rated for 5,000 lbs. Gross Trailer Weight (GTW) and 500 lbs. Tongue Weight (TW). When used with a weight distribution hitch, capacities increase to 6,000 lbs. Weight Distribution (WD) and 600 lbs. Weight Distribution Tongue Weight (WDTW). Always ensure your towing setup does not exceed the lowest-rated component's capacity.

Picha: Karibu view of the standard 2-inch x 2-inch receiver tube, ready for various towing accessories.
The 2-inch x 2-inch receiver tube is compatible with various towing accessories such as ball mounts, bike racks (ensure compatibility with vertical hanging bikes), and cargo carriers. Always verify the compatibility and weight ratings of any accessory used with the hitch.
Video: Demonstrates proper selection and use of ball mount bars to ensure level towing, highlighting the importance of matching receiver and coupler heights.
Matengenezo
This CURT trailer hitch features a unique dual-coat finish of rust-resistant liquid A-coat and highly durable black powder coat. These finishes are co-cured to provide superior resistance to rust, chipping, and UV damage.

Image: Illustrates the dual-coat finishing process, where hitches are submerged in liquid A-coat for rust resistance.
To maintain the hitch's condition, regularly inspect it for any signs of damage or wear. Clean the hitch periodically to remove dirt, salt, and other corrosive materials. Touch up any chips or scratches in the powder coat to prevent rust.
Kutatua matatizo
If you encounter difficulties during installation, such as interference with the exhaust hanger or bumper brackets, refer to the detailed instructions provided with your product. Some vehicle models may require minor adjustments or specific hardware configurations.
Ensure all bolts are properly torqued. Loose bolts can lead to unsafe towing conditions. If any parts are missing or damaged upon arrival, contact customer support for assistance.
Vipimo
- Chapa: CURT
- Nambari ya Mfano: 13086
- Nyenzo: Chuma cha Carbon
- Maliza Aina: GLOSS BLACK POWDER COAT
- Receiver Tube Size: Inchi 2 x inchi 2
- Uzito wa Jumla wa Trela (GTW): ratili 5,000.
- Tongue Weight (TW): ratili 500.
- Weight Distribution (WD) Capacity: ratili 6,000.
- Weight Distribution Tongue Weight (WDTW): ratili 600.
- Uzito wa Kipengee: Pauni 60.3
- Vipimo vya Bidhaa: Inchi 44 x 15 x 8
- Kiwango cha Kujaribu: SAE J684
Udhamini & Msaada
CURT products are designed and tested to meet SAE J684 standards for safety, ensuring reliable performance. For specific warranty information and customer support, please refer to the documentation included with your product or visit the official CURT webtovuti.


