
1. Utangulizi
The AVMATRIX Shark H4 is a compact and versatile multi-camera video switcher designed for live streaming and video production. It integrates 4 HDMI inputs, a 6-channel audio mixer, and multiple output options including HDMI PGM, HDMI multiview, USB Type-C, and LAN for streaming. This manual provides essential information for setting up, operating, and maintaining your Shark H4 switcher.
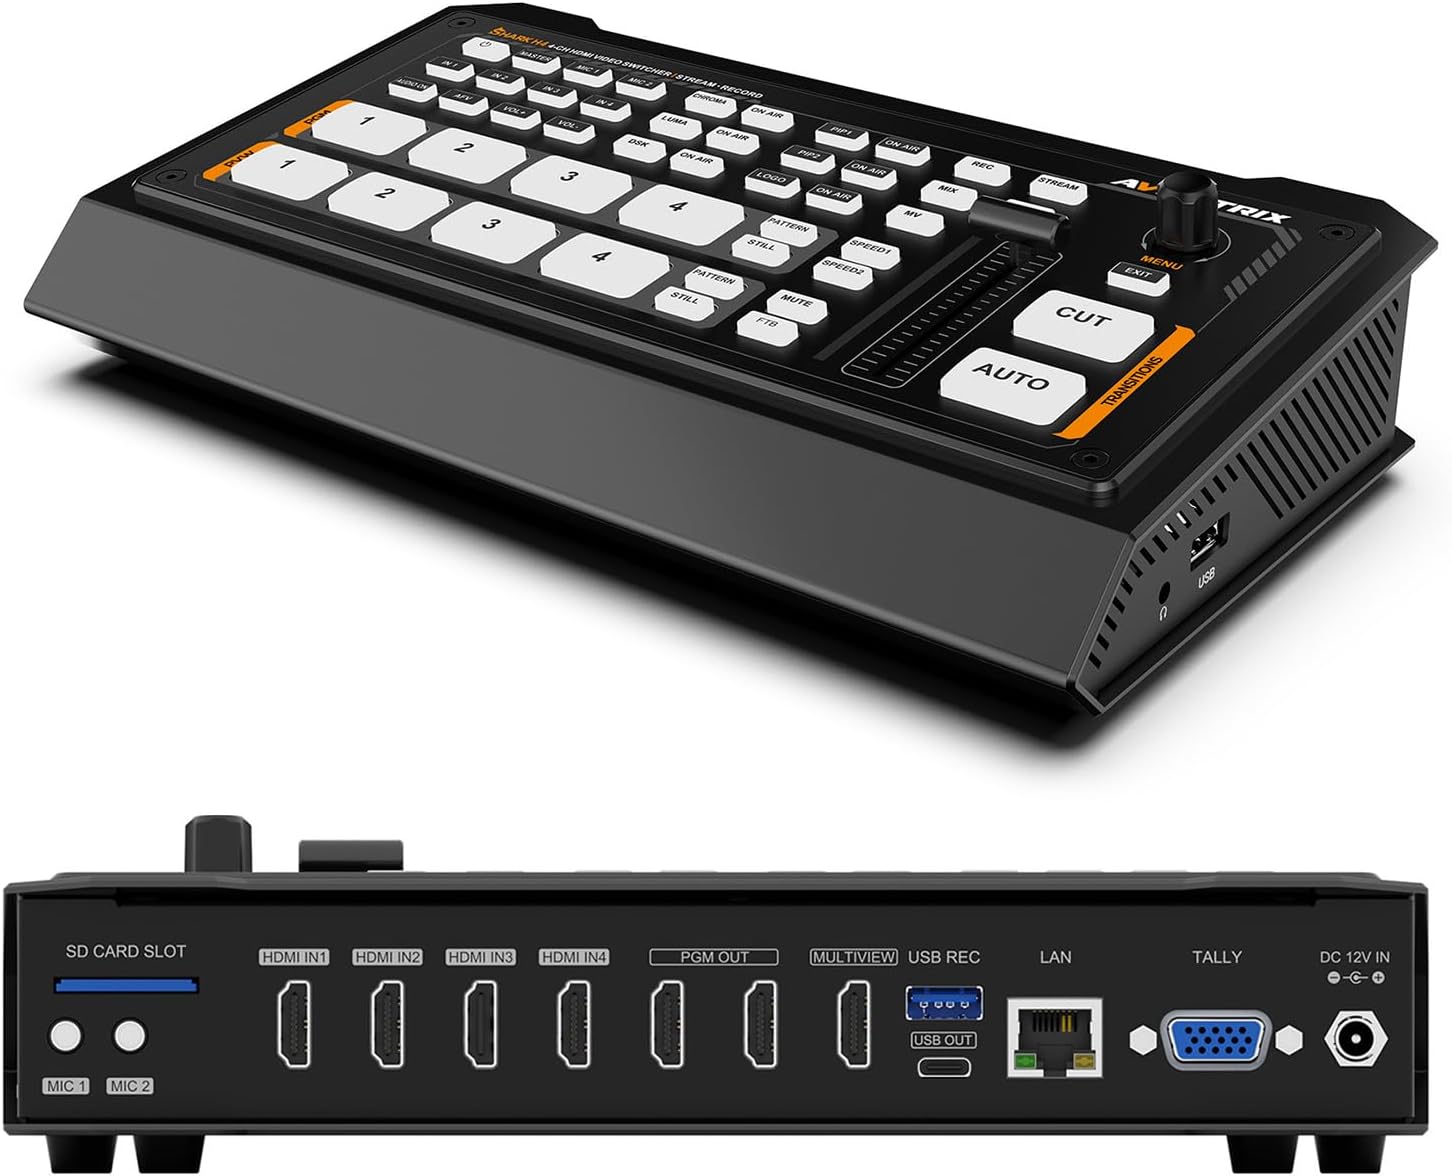
Kielelezo 1: Mbele na nyuma view of the AVMATRIX Shark H4 Multi-Camera Video Switcher, showcasing muundo wake mdogo na milango mbalimbali ya kuingiza/kutoa.
2. Kuweka
2.1 Yaliyomo kwenye Kifurushi
Kabla ya kuendelea na usanidi, hakikisha vipengele vyote vipo kwenye kifurushi:
- AVMATRIX Shark H4 Video Switcher Unit
- Adapta ya Nguvu
- USB Type-A hadi Type-C Cable
- Kiunganishi cha Tally
- Mwongozo wa Mtumiaji (hati hii)

Figure 2: The AVMATRIX Shark H4 switcher along with its included accessories, such as power supply, USB cable, and tally connectors.
2.2 Connecting the Switcher
- Muunganisho wa Nishati: Connect the provided power adapter to the DC 12V IN port on the rear panel of the Shark H4 and then to a power outlet.
- Ingizo za Video: Connect up to four HDMI sources (e.g., cameras, computers) to the HDMI IN1, IN2, IN3, and IN4 ports.
- Matokeo ya Video:
- Connect your program monitor to one of the HDMI PGM OUT ports.
- Connect a multiview monitor to the HDMI MULTIVIEW OUT port to see all inputs simultaneously.
- For USB capture, connect a USB Type-C cable from the USB OUT port to your computer.
- For network streaming, connect an Ethernet cable to the LAN port.
- Pembejeo za Sauti: Connect microphones or line-level audio devices to the MIC 1 and MIC 2 inputs (3.5mm stereo jack). The switcher also supports embedded audio from HDMI inputs.
- Pato la Sauti: Connect headphones to the EARPHONE OUT port for audio monitoring.
- USB/SD Card for Recording: Insert an SD card into the SD CARD SLOT or connect a USB drive to the USB REC port for direct program recording.
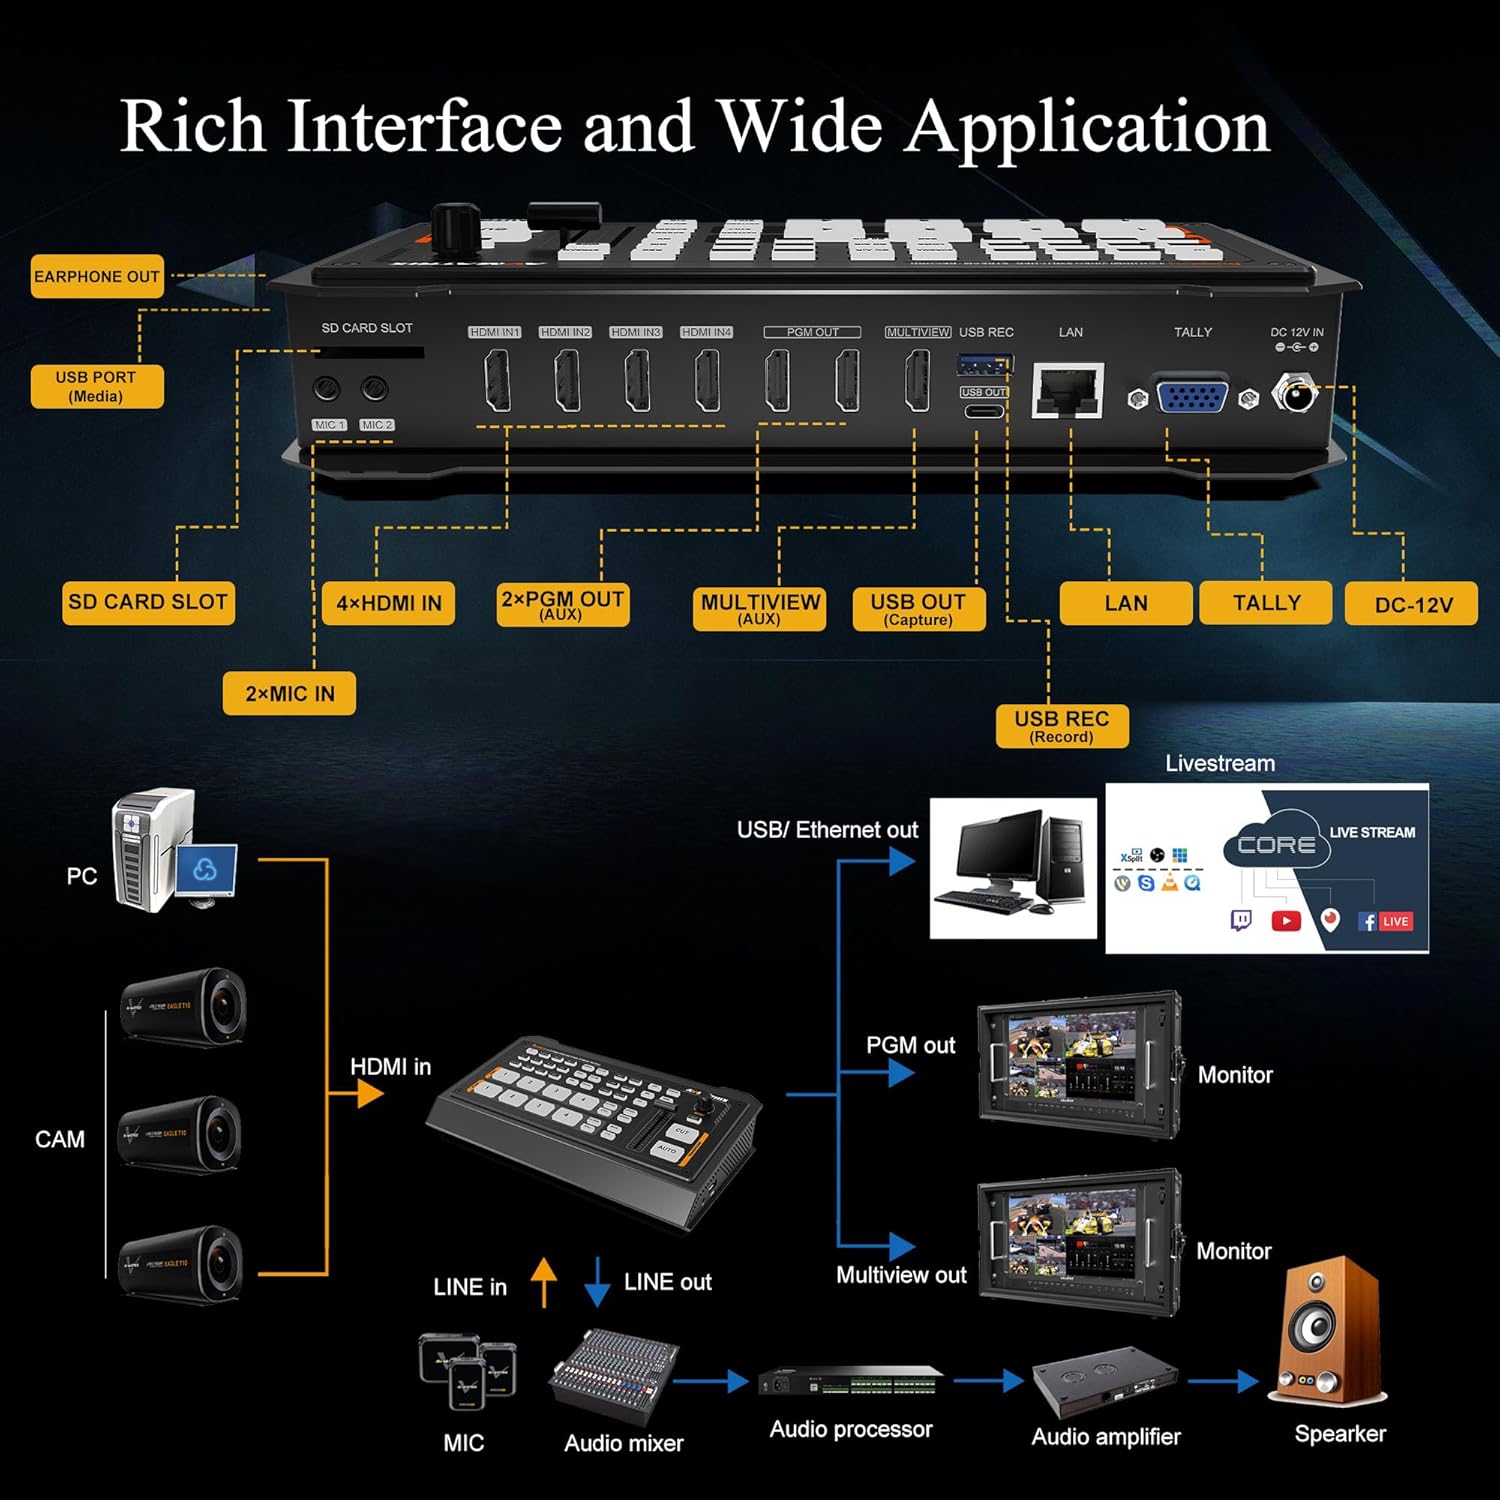
Figure 3: Detailed diagram illustrating the various input and output connections on the AVMATRIX Shark H4, including HDMI, USB, LAN, and audio ports.
3. Maagizo ya Uendeshaji
3.1 Kubadilisha Msingi
The Shark H4 features a control panel with dedicated buttons for each input. To switch between video sources:
- Press the numbered buttons (1-4) under the PVW (Kablaview) section to select the input you wish to preview.
- Press the corresponding numbered button under the PGM (Program) section to send that input directly to the program output (a "cut" transition).
- Vinginevyo, tumia AUTO button for an automatic transition between the preview and program sources, or the KATA button for an instant switch. The T-bar can also be used for manual transitions.
3.2 Uchanganyaji wa Sauti
The integrated 6-channel audio mixer allows for precise control over audio levels. Use the dedicated audio controls on the device or access the audio settings menu to adjust levels for each HDMI input and the MIC/Line inputs. An earphone output is available for monitoring.
3.3 Video Effects and Transitions
The Shark H4 supports various video effects and transitions to enhance your live production:
- Mpito: Select from WIPE (9x2 patterns), MIX, or DIP effects using the dedicated buttons.
- Ufunguo: Utilize Chroma Key and Luma Key for advanced compositing.
- PIP/POP: Picture-in-Picture (PIP) and Picture-out-Picture (POP) functions allow you to display multiple video sources simultaneously.
- DSK & Logo: Downstream Key (DSK) and Logo insertion features are available for adding graphics and branding.

Figure 4: Visual representation of the Chroma Key feature, demonstrating its ability to replace a specific color background with another video source or image.
3.4 Recording and Streaming
The Shark H4 offers flexible recording and streaming options:
- USB Disk & SD Card Record: Record the PGM signal directly to an SD card or USB drive. Supported file formats include MP4/TS, with encoding bitrates up to 32Mbps.
- RTMP/SRT/USB Livestream:
- The LAN port supports IP streaming via RTMP(S) & SRT protocols for direct streaming to platforms.
- The USB Type-C port allows the switcher to function as a webcam, capturing video and audio for streaming software like OBS, vMIX, ZOOM, Teams, Skype, and VLC. It is compatible with Windows, Linux, and Mac operating systems.

Figure 5: The AVMATRIX Shark H4 connected to a laptop for USB capture and streaming, alongside icons representing various streaming platforms.
3.5 PC Remote Control
All settings and functions of the Shark H4 can be controlled remotely using PC-based control software connected via the LAN port. This provides an extended interface for managing complex productions.
4. Matengenezo
To ensure the longevity and optimal performance of your AVMATRIX Shark H4, follow these maintenance guidelines:
- Kusafisha: Use a soft, dry cloth to clean the exterior of the device. Avoid using liquid cleaners or solvents, which can damage the finish or internal components.
- Hifadhi: When not in use, store the switcher in a cool, dry place away from direct sunlight and extreme temperatures.
- Uingizaji hewa: Ensure the ventilation slots are clear and unobstructed to prevent overheating.
- Usimamizi wa Cable: Properly manage cables to prevent strain on ports and accidental disconnections.
5. Utatuzi wa shida
This section addresses common issues you might encounter with the AVMATRIX Shark H4. If the problem persists, please contact customer support.
| Tatizo | Sababu inayowezekana | Suluhisho |
|---|---|---|
| No video output on PGM/Multiview. | Incorrect input selection, loose cable connection, or incompatible resolution. | Verify input selection, check all HDMI cable connections, ensure input/output resolutions are supported. |
| No audio output or distorted audio. | Audio levels too low/high, incorrect audio input selected, or faulty audio cable. | Adjust audio levels in the mixer, confirm correct audio input source, check audio cable integrity. |
| Streaming not working. | Incorrect network settings, firewall blocking, or streaming software misconfiguration. | Check network connection, verify RTMP/SRT settings, ensure streaming software recognizes the USB capture device. |
| Recording fails. | SD card/USB drive full, incompatible format, or drive not recognized. | Ensure sufficient storage space, format the SD card/USB drive to a supported file system (FAT32/exFAT/NTFS), reinsert the drive. |
6. Vipimo
Below are the technical specifications for the AVMATRIX Shark H4 Multi-Camera Video Switcher:
| Kipengele | Maelezo |
|---|---|
| Vipimo vya Bidhaa | Inchi 9.6 x 5.6 x 1.7 |
| Uzito wa Kipengee | Pauni 2.9 |
| Nambari ya Mfano wa Kipengee | PAPA H4 |
| Mtengenezaji | AVMATRIX |
| Rangi | Nyeusi |
| Aina ya kiunganishi | HDMI, USB |
| Aina ya Cable | HDMI, USB |
| Idadi ya Bandari | 10 (4 HDMI In, 2 HDMI PGM Out, 1 HDMI Multiview Out, 1 USB Type-C Out, 1 LAN Out, 2 MIC In) |
| Ingizo za Video | 4 x HDMI |
| Matokeo ya Video | 2 x HDMI PGM, 1 x HDMI Multiview, 1 x USB Type-C, 1 x LAN (for livestream) |
| Uingizaji wa Sauti | 4 x HDMI embedded audio, 2 x MIC/Line In (3.5mm stereo) |
| Miundo ya Kurekodi | MP4/TS (USB Disk & SD Card) |
| Itifaki za Utiririshaji | RTMP(S), SRT (LAN), USB (webcam mode) |
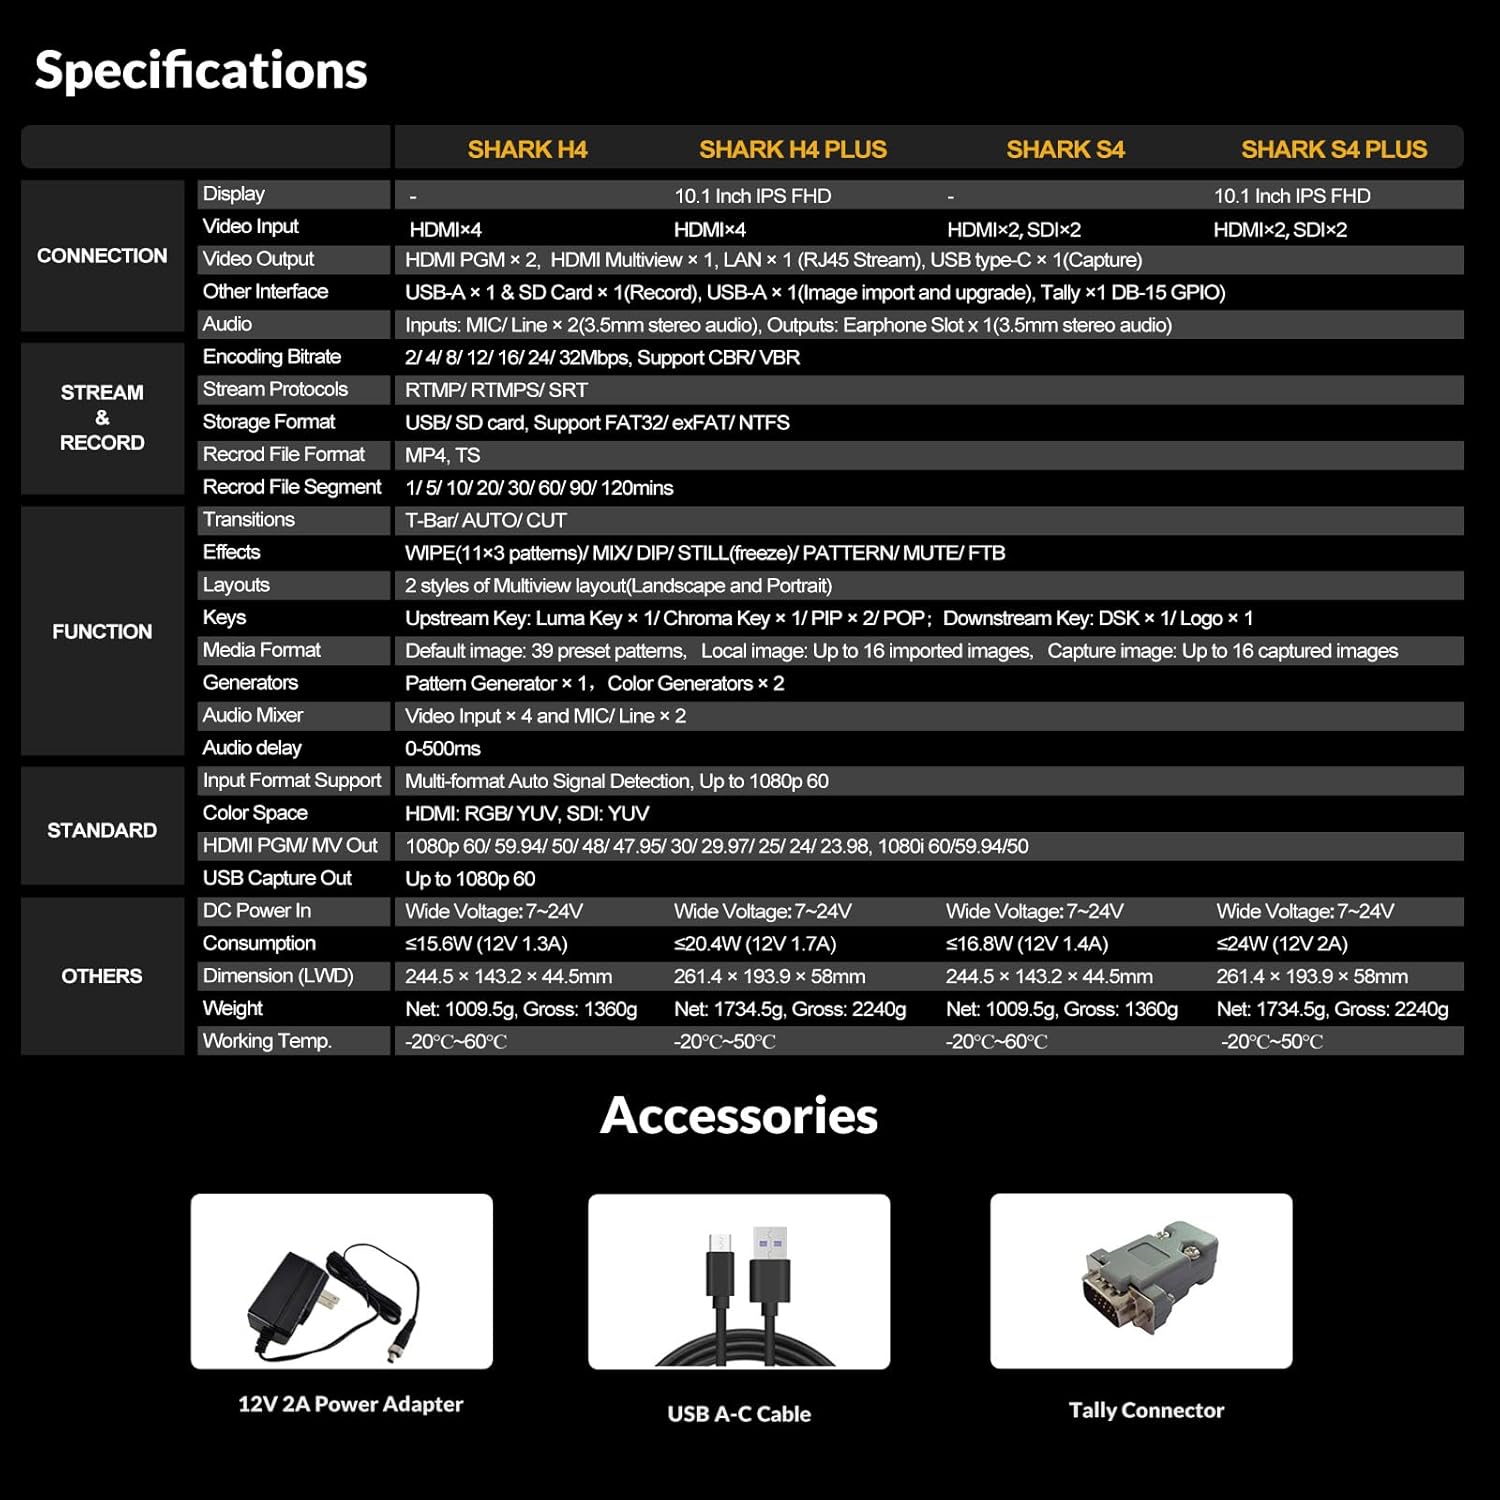
Figure 6: A comprehensive table outlining the specifications of the AVMATRIX Shark H4, including connections, streaming, recording, and physical attributes.
7. Udhamini na Msaada
AVMATRIX products are designed for reliability and performance. For warranty information, technical support, or service inquiries, please refer to the warranty card included in your product package or visit the official AVMATRIX webtovuti. Weka risiti yako ya ununuzi kama dhibitisho la ununuzi kwa madai ya udhamini.
Official AVMATRIX Store: Visit the AVMATRIX Store on Amazon


