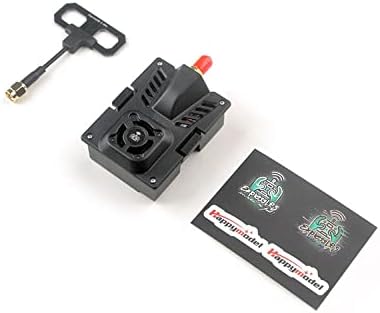
The HappyModel ES24TX Pro is an advanced 2.4GHz ExpressLRS (ELRS) Micro TX module designed for remote control transmitters. It offers a maximum output power of 1000mW, ensuring robust signal transmission. This module features a built-in cooling fan to maintain optimal operating temperatures during high-power use and an RGB LED for status indication. It is compatible with most OpenTX radio transmitters equipped with a Micro JR bay, including popular models like the TX16S, QX7, TX12, and X9D. The module comes pre-installed with ExpressLRS firmware for plug-and-play functionality.
Image 1: HappyModel ES24TX Pro Micro TX Module with antenna connector.
2. Bidhaa za Bidhaa
Nguvu ya Juu ya Pato: Up to 1000mW for extended range and signal reliability.
Feni ya Kupoeza Iliyounganishwa: Ensures stable performance by preventing overheating during high-power operation.
RGB LED Module: Hutoa maoni kuhusu hali ya kuona.
Utangamano mpana: Supports OpenTX radio transmitters with a Micro JR bay (e.g., TX16S, QX7, TX12, X9D).
Pre-installed ExpressLRS Firmware: Ready for immediate use upon installation.
Compact Micro TX Form Factor: Designed for easy integration into compatible radio transmitters.
3. Ni nini kwenye Sanduku
Kifurushi kawaida hujumuisha sehemu zifuatazo:
HappyModel ES24TX Pro Micro TX Module
Antena
Vibandiko (vinaweza kutofautiana)
Image 2: Contents of the HappyModel ES24TX Pro package, including the module, antenna, and stickers.
4. Vipimo
Kipengele
Vipimo
Nambari ya Mfano
ES24TX Pro
Upeo wa Nguvu ya Pato
1000mW
Mzunguko
2.4GHz (ExpressLRS)
Kupoa
Shabiki wa kupoza aliyejengwa
Kiashiria cha Hali
Moduli ya LED ya RGB
Utangamano
OpenTX radio transmitters with Micro JR bay (e.g., TX16S, QX7, TX12, X9D)
Pre-installed Firmware
ExpressLRS
Uzito wa Kipengee
3.2 wakia
Vipimo vya Kifurushi
Inchi 5.63 x 4.37 x 2.44
5. Maagizo ya Kuweka
5.1 Ufungaji wa Kimwili
Ensure your radio transmitter is powered off.
Locate the Micro JR bay on the back of your compatible OpenTX radio transmitter (e.g., TX16S, QX7, TX12, X9D).
Carefully insert the ES24TX Pro module into the JR bay, ensuring it is seated firmly.
Attach the provided antenna to the SMA connector on the module. Hand-tighten only; do not overtighten.
Image 3: The ES24TX Pro module correctly installed in the JR bay of a compatible radio transmitter.
5.2 Radio Transmitter Configuration
Power on your radio transmitter.
Navigate to the Model Setup menu in OpenTX/EdgeTX.
Scroll to the "External RF" section.
Set the External RF mode to "CRSF" (Crossfire) as ExpressLRS uses the CRSF protocol.
Ensure the internal RF module is turned off if you are using the external ELRS module exclusively.
5.3 Firmware Flashing (Advanced Users)
While the module comes with pre-installed ExpressLRS firmware, advanced users may wish to update or flash custom firmware. This typically involves:
Accessing internal switches: Some users report needing to open the module casing to access internal switches for flashing. Refer to community resources or HappyModel documentation for specific instructions for your module version.
Connecting via USB-C: The module features a USB-C port for firmware updates.
Using the ExpressLRS Configurator: Download the latest ExpressLRS Configurator software to compile and flash firmware.
Picha 4: Ndani view of the ES24TX Pro module, showing the heatsink and potential access points for advanced configuration.
6. Maagizo ya Uendeshaji
6.1 Binding to a Receiver
To establish a connection between the ES24TX Pro module and an ExpressLRS receiver:
Ensure both the TX module and the receiver are powered on.
Put the receiver into binding mode (typically by cycling power three times or pressing a bind button). The receiver's LED will usually flash rapidly.
On your radio transmitter, navigate to the ExpressLRS LUA script (usually found in the Tools menu).
Select the "Bind" option within the LUA script. The TX module's RGB LED will indicate binding status.
Once bound, the receiver's LED should become solid, and the TX module's LED will indicate a successful connection.
6.2 Adjusting Power Output
The ES24TX Pro supports adjustable power output up to 1000mW. Adjusting power is crucial for optimal performance and to prevent overheating.
Access the ExpressLRS LUA script on your radio transmitter.
Locate the "Power" or "TX Power" setting.
Select the desired power level (e.g., 10mW, 25mW, 100mW, 250mW, 500mW, 1000mW).
For indoor flying or short ranges, lower power settings (e.g., 100mW) are often sufficient.
For outdoor flying or longer ranges, higher power settings (e.g., 250mW or above) may be used.
Muhimu: When using higher power settings, ensure the built-in cooling fan is active to prevent overheating. The fan can usually be enabled or configured within the LUA script.
6.3 RGB LED Status Indicators
The RGB LED on the module provides visual feedback on its operational status. Refer to the official ExpressLRS documentation for a complete list of LED patterns and their meanings. Common indications include:
Kijani Kibichi: Connected and operating normally.
Kijani Inang'aa: Binding mode or waiting for connection.
Nyekundu Imara: Error or fault condition.
Nyekundu Inang'aa: Overheating warning or low voltage.
7. Matengenezo
Weka Safi: Regularly clean the module and its connectors with a soft, dry cloth. Avoid using liquids or harsh chemicals.
Utunzaji wa Antena: Ensure the antenna is securely attached before each use. Avoid bending or stressing the antenna excessively.
Kipeperushi cha kupoeza: Periodically check the cooling fan for dust or obstructions. A blocked fan can lead to overheating.
Hifadhi: Hifadhi moduli mahali pakavu na penye baridi mbali na jua moja kwa moja na halijoto kali.
Sasisho za Firmware: While not strictly maintenance, keeping the firmware updated can improve performance and add new features. Refer to the ExpressLRS project for the latest firmware and update procedures.
8. Utatuzi wa shida
8.1 Module Not Powering On / No LED
Angalia Muunganisho: Ensure the module is fully seated in the JR bay of your radio transmitter.
Nguvu ya Redio: Verify that your radio transmitter is powered on and has sufficient battery charge.
Usanidi wa Redio: Confirm that the external RF module is enabled in your radio's model settings.
Module Fault: If the module previously worked and now shows no signs of life, it might be faulty.
8.2 Unable to Bind to Receiver
Firmware Mismatch: Ensure both the TX module and the receiver are running compatible ExpressLRS firmware versions. It is recommended to use the same major version.
Binding Phrase: If using a binding phrase, ensure it is identical on both the TX module and the receiver.
Utaratibu wa Kufunga: Double-check that you are following the correct binding procedure for both the receiver and the TX module (e.g., power cycling the receiver correctly).
Ukaribu: Keep the receiver close to the TX module during the binding process.
8.3 Module Overheating
Enable Fan: Ensure the built-in cooling fan is enabled and operating, especially when using higher power output settings (250mW and above). This can usually be configured via the ExpressLRS LUA script.
Mtiririko wa hewa: Ensure the fan intake and exhaust vents are not obstructed.
Mpangilio wa Nguvu: Reduce the TX power output if overheating persists, especially in warm environments or during prolonged use.
8.4 Intermittent Connection / Range Issues
Angalia Antena: Verify that the antenna is securely connected to the module and is not damaged.
Nafasi ya Mpokeaji: Ensure the receiver antenna(s) on your drone/aircraft are properly positioned and not obstructed by carbon fiber or other components.
Pato la Nguvu: Increase the TX power output if operating at longer ranges, ensuring the cooling fan is active.
Mazingira: Be aware of potential interference from Wi-Fi, other 2.4GHz devices, or physical obstructions in your flying area.
9. Udhamini na Msaada
For warranty information and technical support, please refer to the official HappyModel website or contact your retailer. Specific warranty terms may vary by region and point of purchase. It is recommended to retain your proof of purchase for any warranty claims.
For general ExpressLRS information, firmware, and community support, visit the official ExpressLRS project webtovuti.
Ask about setup, troubleshooting, compatibility, parts, safety, or missing instructions. Manuals+ will review the question and use this page’s manual context to help answer it.