1. Bidhaa Imeishaview
The STMicroelectronics NUCLEO-64 boards offer an accessible and adaptable platform for developing and prototyping with STM32 microcontrollers. The NUCLEO-F446RE board features the STM32F446RET6 microcontroller, providing a balance of performance, power efficiency, and diverse functionalities. It supports Arduino Uno V3 connectivity and includes ST morpho headers for expanding its capabilities with various specialized shields.
This board integrates an ST-LINK/V2-1 debugger and programmer, eliminating the need for separate debugging tools. It comes with the comprehensive STM32 software HAL library, numerous software examples, and access to Arm Mbed online resources.
Sifa Muhimu:
- STM32F446RET6 microcontroller in LQFP64 package.
- High-performance ARM Cortex-M4 core with DSP and FPU, 512 Kbytes Flash, 180 MHz CPU.
- On-board ST-LINK/V2-1 debugger/programmer with SWD connector and USB re-enumeration (mass storage, Virtual COM port, debug port).
- Arduino Uno V3 connectivity support and ST morpho extension pin headers.
- Flexible power-supply options: ST-LINK USB VBUS or external sources.
- One user LED shared with Arduino, two additional LEDs, and two push-buttons (user and reset).
- 32.768 kHz LSE crystal oscillator.
- Maktaba za programu zisizolipishwa za kina na mfanoamples via STM32Cube MCU Package.
- Support for various Integrated Development Environments (IDEs) including IAR, Keil, GCC-based IDEs, and Arm Mbed.

Kielelezo 1: Mbele view of the NUCLEO-F446RE Development Board, showing the microcontroller, connectors, and buttons.
2. Usanidi na Usanidi wa Awali
Follow these steps to set up your NUCLEO-F446RE development board for the first time.
2.1. Kuanza
- Check Jumper Positions: Ensure jumpers JP1 (off), JP5 (PWR) on U5V side, and JP6 (IDD) are correctly set on the board.
- Unganisha kwa Kompyuta: Connect the STM32 Nucleo board to a PC using a USB Type-A to Mini-B cable through connector CN1.
- Power-Up Indication: Upon successful connection, the red LEDs LD3 (PWR) and LD1 (COM) should light up, and the green LED LD2 will blink.
- User Button Test: Press the user button B1 (left button) and observe the blinking pattern of the green LED LD2. It should change according to the button press.
- Programu ya Onyesho: The board comes with pre-loaded demo software. Explore its features to understand basic functionalities.
- Develop Applications: Begin developing your own applications using available examples and libraries.

Figure 2: Packaging detail showing initial setup instructions and system requirements.
2.2. Mahitaji ya Mfumo
- Mfumo wa Uendeshaji: Windows® OS (7, 8 and 10), Linux® 64-bit, or macOS®.
- Cable ya USB: USB Type-A to Mini-B cable for connection to PC.
2.3. Development Toolchains
The NUCLEO-F446RE board supports a wide range of development environments:
- Kitanda cha kazi kilichopachikwa
- Keil MDK-ARM
- GCC-based IDEs (e.g., STM32CubeIDE)
- Arm Mbed online compiler (for compatible Nucleo part numbers)
3. Uendeshaji
The NUCLEO-F446RE board is designed for flexible operation, supporting various programming and debugging methods.
3.1. Kuweka programu na kurekebisha hitilafu
The integrated ST-LINK/V2-1 debugger/programmer allows for easy code upload and debugging. When connected via USB, the ST-LINK/V2-1 enumerates as three different interfaces:
- Kifaa cha Kuhifadhi Misa: For drag-and-drop programming of binary files.
- Mlango wa COM wa kweli: For serial communication with the host PC.
- Debug Port: For debugging applications using compatible IDEs.
3.2. Expanding Functionality
The board's functionality can be extended using its expansion connectors:
- Arduino Uno V3 Connectivity: Allows attachment of Arduino-compatible shields.
- ST Morpho Extension Headers: Provides full access to all STM32 I/Os for custom connections and shield development.
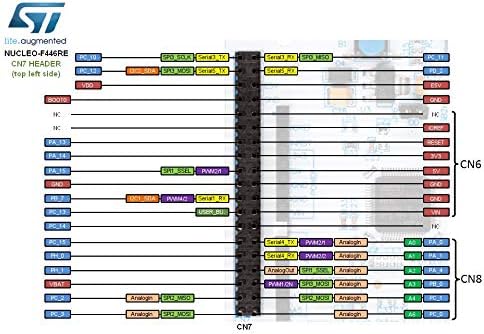
Figure 3: Pinout diagram illustrating the CN7 header connections for the NUCLEO-F446RE board.
4. Matengenezo
To ensure the longevity and reliable operation of your NUCLEO-F446RE board, follow these general maintenance guidelines:
- Kushughulikia kwa Uangalifu: Avoid dropping or subjecting the board to physical shock.
- Utoaji Tuli: Always handle the board in an environment free of static electricity. Use an anti-static mat and wrist strap if possible.
- Mazingira Safi: Operate and store the board in a clean, dry, and dust-free environment.
- Kusafisha: If cleaning is necessary, use a soft, dry brush or compressed air to remove dust. Avoid liquid cleaners.
- Power Off Before Connecting/Disconnecting: Always disconnect power before connecting or disconnecting any shields, cables, or components to prevent damage.
5. Utatuzi wa shida
If you encounter issues with your NUCLEO-F446RE board, consider the following troubleshooting steps:
- No Power Indication (LEDs Off):
- Ensure the USB cable is securely connected to both the board (CN1) and the PC.
- Jaribu mlango tofauti wa USB au kebo.
- Verify that the PC's USB port is providing power.
- Check jumper settings, especially JP5 (PWR).
- ST-LINK/V2-1 Not Recognized by PC:
- Install the necessary ST-LINK drivers. These are usually part of the STM32CubeIDE or available on the STMicroelectronics webtovuti.
- Jaribu kuanzisha upya Kompyuta yako.
- Ensure the USB cable is functioning correctly.
- Application Not Running/Debugging Issues:
- Verify your development environment (IDE) is correctly configured for the STM32F446RET6 microcontroller.
- Check your code for errors and ensure it's compiled correctly.
- Ensure the debugger is connected and configured properly in your IDE.
- Reset the board using the reset button.
- Masuala ya Pembeni:
- Double-check all wiring and connections to external components or shields.
- Verify that the correct pins are being used and initialized in your software.
- Consult the STM32F446RET6 datasheet and reference manual for peripheral configuration details.
6. Maelezo ya kiufundi
| Kipengele | Maelezo |
|---|---|
| Microcontroller | STM32F446RET6 (ARM Cortex-M4 with DSP and FPU) |
| Kasi ya CPU | 180 MHz |
| Kumbukumbu ya Flash | 512 KB |
| Debugger/Programmer | On-board ST-LINK/V2-1 |
| Muunganisho | USB (ST-LINK), Arduino Uno V3, ST Morpho headers |
| Kiolesura cha Mtumiaji | 1 user LED (shared with Arduino), 2 additional LEDs, 1 user button, 1 reset button |
| Oscillator | 32.768 kHz LSE fuwele |
| Ugavi wa Nguvu | ST-LINK USB VBUS or external sources |
| Uzito wa Kipengee | Wakia 0.01 (takriban.) |
| Vipimo vya Kifurushi | Inchi 4.61 x 3.78 x 1.57 (takriban.) |
7. Udhamini na Msaada
Specific warranty information for the STMicroelectronics NUCLEO-F446RE development board is typically provided at the point of purchase or on the official STMicroelectronics website. Please refer to the documentation included with your product or visit the manufacturer's webtovuti kwa sheria na masharti ya udhamini wa kina.
For technical support, documentation, software downloads, and community forums, please visit the official STMicroelectronics support pages. These resources offer extensive information, FAQs, and assistance for developing with STM32 microcontrollers and Nucleo boards.
Official STMicroelectronics Webtovuti: www.st.com/stm32nucleo